
Quick answer
Use a clear photo, select the correct size, crop, and download.
Passport photos are required for many forms and IDs. This guide shows the steps, and our tool makes it easy.
Key takeaways
- Use a recent, sharp, front-facing photo with even lighting and no filters.
- Match the exact size your form asks for - 35×45 mm is the default for most Indian forms.
- Add an A4 sheet only if you need multiple printed copies to cut and use.
- Add name/date text only when the form specifically asks for it.
1. Why Make Your Passport Photo Online?
We’ve all been there: you are filling out an important online application for a government job, a university admission, or a visa renewal, and you hit a roadblock. The portal demands a passport-size photo with incredibly specific requirements-maybe it needs to be exactly 35x45 mm, under 50KB in file size, and feature a pure white background.
Historically, your only option was to drop everything, drive to a local photo studio, wait in line, and pay a premium for a physical sheet of photos (and hopefully a digital copy on a pendrive). Worse yet, if you tried using a mobile app, you were often hit with hidden fees, subscriptions, or ugly watermarks right across your face just before downloading.
The modern solution? Create your passport photo online. By using a specialized web tool like Photocopywala, you gain complete control over your document preparation. You save time, you save money, and you ensure your privacy-all while generating a file that is perfectly formatted to pass even the strictest portal validations.
Video tutorial
Watch: How to Make Passport Size Photo on A4 Sheet Online Free
If you prefer seeing the full workflow before using the tool, this video shows how to prepare passport-size photos on an A4 sheet with Photocopywala.
2. The Golden Rules of a Perfect Source Photo
The final result of any online photo maker is entirely dependent on the quality of the image you upload. An AI background remover can change your backdrop to white, but it cannot fix a blurry face or terrible lighting. Before you upload an image, ensure it passes this checklist:
A. Lighting is Everything
- Natural Light is Best: Stand facing a window during the day. Soft, natural light illuminates your face evenly and eliminates harsh shadows.
- Avoid Overhead Lights: Standing directly under a bright ceiling bulb will cast dark, unflattering shadows under your eyes, nose, and chin.
- Even Illumination: Ensure both sides of your face are equally lit. Half-shadowed faces are frequently rejected by official portals.
B. Posture and Expression
- Face the Camera Directly: Your head and shoulders must be perfectly squared to the camera. Do not tilt your head up, down, or to the side.
- Neutral Expression: Keep your mouth closed and your eyes open. Avoid exaggerated smiles, frowning, or raising your eyebrows.
- Eye Contact: Look directly into the lens of your camera, not at the screen.
C. Clothing and Accessories
- Contrast your Clothing: Wear a dark or brightly colored shirt. Since your final background will likely be white or light blue, wearing a white shirt can cause your shoulders to blend into the background.
- Remove Glasses (If Possible): Even if you wear prescription glasses daily, many official forms (like US Visas or Indian Passports) strongly prefer or mandate photos without glasses to prevent glare obscuring your eyes.
- Headwear: Avoid hats, caps and sunglasses. Religious headwear is usually permitted if it does not hide the face or cast a shadow, but follow the current form instruction.
D. Zero Editing
- No Filters: Absolutely no Instagram, Snapchat, or beauty filters. Your skin tone must look natural.
- No Retouching: Do not digitally remove moles, scars, or birthmarks. The photo must be a true representation of your current appearance.
3. Understanding Passport Photo Dimensions and Ratios
The term "passport size" is not universal. Different organizations and countries have entirely different dimensional requirements. Getting this wrong is the #1 reason applications are rejected.
The Indian Standard: 35 x 45 mm
For the vast majority of domestic applications in India, the standard size is 35 mm (width) by 45 mm (height). This translates to an aspect ratio of roughly 35:45.
- Where it is used: PAN Card applications, UPSC exams, SSC exams, NEET/JEE admit cards, school records, job forms and many state government workflows. Aadhaar photos are normally captured at the enrolment/update centre.
- Digital Pixels: At a standard print resolution of 300 DPI, a 35x45mm photo is exactly 413 x 531 pixels.
The Global / Visa Standard: 51 x 51 mm (2 x 2 inches)
If you are applying for international travel, the requirements shift.
- Where it is used: US Visas, the official Indian Passport Seva portal, and many international ID documents.
- Digital Pixels: At 300 DPI, this equates to exactly 600 x 600 pixels. This is a perfect 1:1 square aspect ratio.
Pro Tip: Always read the official notification or application brochure before generating your photo. If the portal explicitly states "Upload a 3.5cm x 4.5cm photograph", choose the 35×45mm preset inside our Passport Size Photo Maker to ensure mathematical precision.
For the full breakdown of every size (India, US, UK, and more) in pixels, cm, mm and inches, see the dedicated Passport Size Photo Dimensions guide.
4. Step-by-Step: How to Make a Passport Size Photo
Once you have captured a great source photo, turning it into an official document takes less than 60 seconds using our tool. Here is the exact workflow:
Step 1: Upload Your Image
Navigate to the Passport Size Photo Maker Online tool. Click the upload area to select a photo from your gallery, or drag-and-drop the image directly into the box. Because the tool runs entirely on your device, your photo is processed securely without ever being sent to our servers.
Step 2: Select the Output Size and Crop
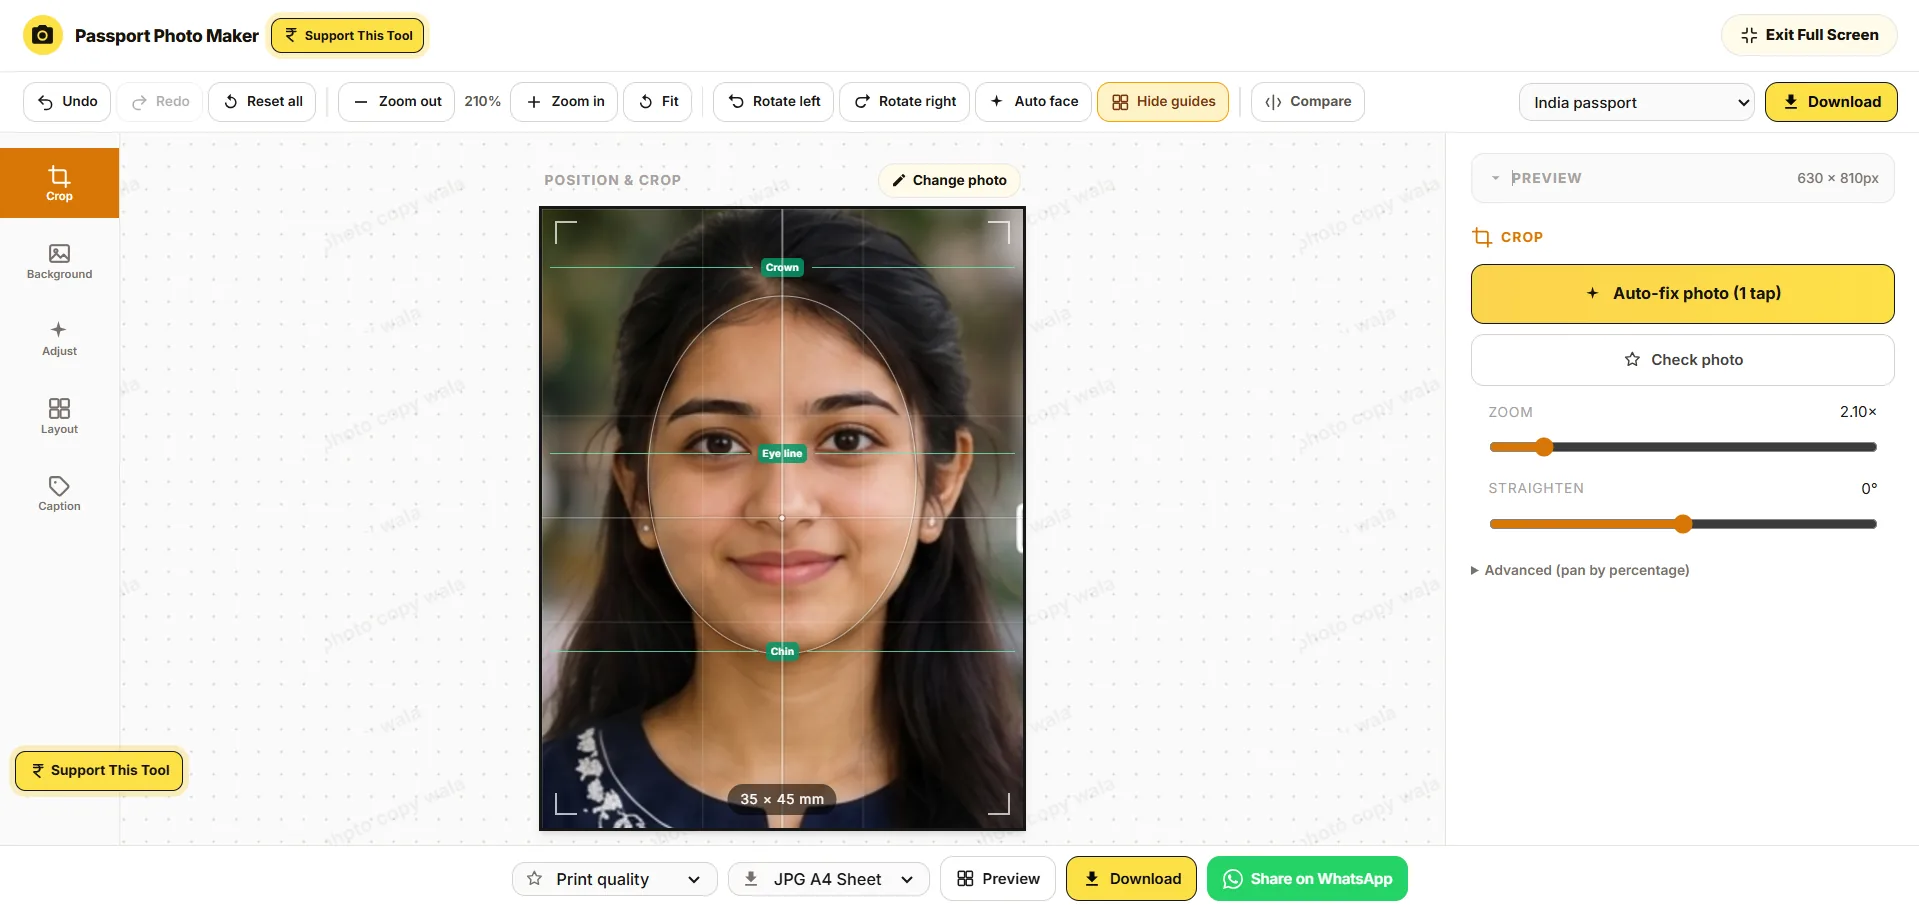
Once uploaded, you will see a preview of your photo inside a crop box. First, select your required dimensions from the dropdown. The crop box will automatically adjust its aspect ratio to match. Then, use your mouse or touchscreen to zoom in and drag the photo. Center your nose in the middle of the frame, ensuring your chin and the crown of your head fit comfortably inside. Leave a visible margin (about 4-5 mm) above your hair.
Step 3: Remove and Change the Background
Click the Remove Background toggle. The tool uses advanced on-device AI to detect your silhouette and strip away the clutter in milliseconds. Below the toggle, click on the Background Color circles to switch to a pure white, light blue, or grey background depending on what your specific form mandates.
Step 4: Check the File Size
Many government and exam portals enforce file size limits such as under 50KB or 100KB. Pick the preset that matches your form's limit, preview the result, and use compression only after the crop is correct so the face stays clear.
5. The Ultimate Guide to A4 Passport Photo Sheet Printing
If you are filling out an online form, a single digital JPEG is all you need. But what if you are submitting a physical application for school admission, opening a bank account (KYC), or attending a walk-in interview? You need hard copies.
Downloading a single 35x45mm digital image and handing it to a local photocopy shop often results in disaster. Inexperienced shop operators might accidentally stretch your photo, ruin the aspect ratio, or charge you excessively for the layout work. The smarter approach is to generate an A4 Passport Photo Sheet yourself.
How the A4 Sheet Works
An A4 sheet (210 x 297 mm) is the standard paper size used by printers worldwide. The A4 Passport Photo Sheet Maker takes your single cropped passport photo and automatically duplicates it in a perfectly aligned grid across an A4 canvas. Depending on the photo size and spacing, a single A4 sheet typically holds 6 to 12 passport photos with enough margin left to cut them cleanly - preview the sheet in the tool to see the exact count for your size.
Printing Best Practices
- Paper Quality: Do not print on standard thin copy paper. Ask the print shop to use high-quality, glossy or matte photo paper (200 GSM or thicker).
- Printer Settings: This is the most crucial step. The printer must be set to "Actual Size" or "100% Scaling". If the printer is set to "Fit to Page", it will shrink your photos.
- Print Resolution: Ensure the printer is set to a high-quality mode (at least 300 DPI) so your facial features remain razor-sharp.
- Cutting: Once printed, do not use dull scissors. Use a sharp craft knife (paper cutter) and a steel ruler to slice cleanly along the white margins.
6. Navigating File Sizes and Formats (The 50KB Struggle)
You have cropped your photo perfectly. You go to upload it, and a red error message flashes: "File size must be under 50KB". Modern smartphone cameras capture images at incredible resolutions, often resulting in file sizes exceeding 3000KB (3MB). Government portals enforce strict KB limits to save server costs.
How to Compress Safely
- Crop First: The act of cropping away 80% of the image (the background and your body) and resizing it to 35x45mm will naturally drop the file size dramatically.
- Compress Second: If the cropped image is still over the limit, choose the size preset with the matching KB target and the tool will compress it automatically at download, preserving facial clarity.
JPG vs. PNG vs. PDF
- JPG/JPEG: This is the absolute standard for digital uploads. 99% of online application portals require JPG.
- PNG: A lossless format that results in very sharp images, but extremely large file sizes. Portals will frequently reject PNGs due to size.
- PDF: Use PDF exclusively when you are downloading an A4 Sheet for physical printing. PDFs preserve mathematical dimensions.
Need to hit an exact KB target like 20KB, 50KB or 100KB? See the step-by-step Passport Size Photo KB Limit guide.
7. Common Reasons for Rejection
Even a perfectly sized photo can be rejected if it fails visual compliance checks. Avoid these common pitfalls:
- The "Floating Head": If you zoom in so much that your ears or the top of your head are cut off, the photo will be rejected.
- Blurriness: If you take a photo from very far away and then aggressively crop in on the face, the resulting image will be pixelated.
- Background Clutter: Shoot against a plain wall to give the AI the easiest job possible.
- Glare on Glasses: The flash from your camera reflecting off your spectacles will obscure your pupils. Take your glasses off.
- Selfie Distortion: Holding the phone too close to your face distorts your nose and forehead.
8. Why Photocopywala is the Best Passport Size Photo Maker
If you search for "passport size photo maker online", you will find dozens of results. Why choose our platform?
| Feature | Photocopywala | Other Tools |
|---|---|---|
| Price | Free | Often paid / credits |
| Watermarks | None | Huge watermarks |
| Account required | No | Yes |
| Privacy | On-Device (Browser) | Uploaded to cloud |
Create your passport size photo now
Open the free passport size photo maker, upload your image, choose the size, prepare the sheet and download a print-ready file.
Make Passport Size PhotoFrequently Asked Questions
How many passport size photos fit on an A4 sheet?
The number of passport size photos on an A4 sheet depends on the selected photo size, spacing and margins. Do not force too many copies into one sheet because cutting space and print accuracy matter. Use the A4 sheet preview and print at actual size for safer results.
Should I download passport photo as JPG, PDF or A4 sheet?
Use JPG or JPEG when an online form asks for image upload. Use an A4 sheet or PDF when you need multiple printed copies. The correct output depends on whether you are uploading to a portal or printing at a photocopy shop.
How to create an A4 passport photo sheet using the Passport Photo Maker tool on PhotocopyWala?
Use the passport photo tool to prepare the correct photo size, then choose an A4 sheet layout if you need multiple copies for printing. Preview the sheet before download so photos are aligned properly and there is enough spacing for clean cutting after print.
Can I add name and date using the Passport Photo Maker tool on PhotocopyWala?
Yes, add name and date only when the form, exam or office specifically asks for it. Many passport or ID requirements do not need text on the photo. If name and date are required, keep the text readable and avoid covering the face or shoulders.
What size is passport size photo for Indian forms?
Indian forms may ask for different sizes such as passport size, 35x45 mm or a specific pixel size. Do not assume one size for every form. Read the instruction on the form first, then use the closest Photocopywala photo tool and check the preview before download.
Can I make passport size photo at home and print it later?
Yes, you can take a clear front-facing photo at home, prepare the crop online and download the image or A4 sheet for printing. Use good lighting, a plain background and a sharp photo. For passport applications, verify Passport Seva photo guidelines before printing.
Why does my passport photo get rejected in online forms?
Rejections usually come down to a few things: the face is too small, the background is wrong, the image is blurry, the file size or dimensions don't match the form, or text was added when it wasn't required. Match the form's exact instruction and preview the final file before you upload it.
Can I use my phone camera for a passport photo?
Yes, a modern smartphone can produce a suitable photo if you use good lighting, a neutral background, and avoid filters. Hold the phone steady and ensure the face fills the frame.
What DPI should I set for printing passport photos on A4?
Use 300 DPI for crisp prints. Most browsers default to 96 DPI, so download the PDF/A4 sheet from Photocopywala and print it with "actual size" at 300 DPI settings in your printer driver.
Do Indian passport applications require a white background?
Yes, the official Passport Seva guidelines specify a plain light-colored (preferably white) background without shadows. Photocopywala’s instant background removal ensures compliance.
Read next
Related blog posts
These guides support the same document, photo, PDF or online-form workflow, so readers can solve the next step without returning to search.
Passport Size Photo Dimensions and Ratio in India
Learn the exact passport size photo dimensions, ratio and pixel sizes for Indian forms, and the correct mm to pixels conversion for online uploads.
Photo ToolsHow to Reduce Passport Size Photo KB Limit for Online Forms
Learn how to reduce your passport size photo to 20KB, 50KB, or 100KB for online form uploads without losing face clarity.
Photo ToolsHow to Remove Photo Background Online for Forms and Shops
Learn how to remove photo background online, make transparent PNG, white background or blue background for forms, shops and document work.
Photo ToolsHow to Resize Signature to 10KB-20KB for Exam and Job Forms
Learn how to resize signature to 10KB-20KB for exam, job and online forms while keeping the signature readable.
Written by
Shrikant Yadav
Website Developer, Photocopywala
Shrikant Yadav writes practical Photocopywala guides for photo tools, PDF tools, document preparation, printable resources, government-link safety and online form help for Indian students, job seekers, shop owners and everyday users.